Want to WOW your friends? Show a video calling service running off your Raspberry Pi.
I've been running some trainings for product managers and developers here in Israel for the past several months. All of them are focused on WebRTC and how it transforms the market.
When I first did my developer training, asking for feedback at the end of the workshop, one thing that was raised is that going over sample code and understanding it isn't enough. What is missing is to show the simplicity. To show how easy it is to get up and running from scratch.
Call it the 0 to 100 kph of doing a hello world video calling.
With WebRTC it can be achieved just before lunch break and in record time.
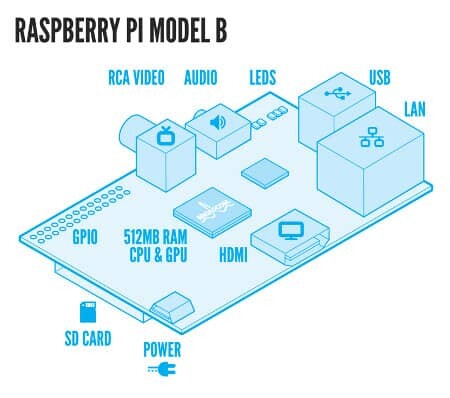
What I decided doing is purchase a Raspberry Pi Starter Kit. For those who don't know, a Raspberry Pi is a small machine (credit card size) that can run Linux. It has an ARM chip, HDMI output, 2 USB inputs, SD card input and Ethernet cable input. You can buy one to create your own home video streamer… or you can use it to teach WebRTC.
The idea was simple:
- Get a vinyl distribution of a Linux operating system for Raspberry Pi
- Install it on the SD card (which is used to boot a Raspberry Pi)
- In the training itself, get and install Node, get and install a sample, run the sample
For the courtesy of those who came to the training, and those who just want to understand how simple this is, here are the step-by-step instructions I came up with for myself. I decided to do this on a Windows machine (just because it is what I have during the trainings to show the presentation).
1. Things to download and install
My assumption is that your machine has an SD card reader/writer. Most laptops these days do (mine has one). You will have to have a few tools on your Windows machine to get things going:
- SD Formatter – to format the SD card when needed and before first use
- Win32 Disk Imager – to write the OS image to the SD card
- Nmap and Zenmap – to locate your Raspberry Pi on the network
- Bitvise SSH Client – or any other SSH client for Windows (not needed on Linux)
Install all of the above.
2. Get a Raspberry Pi operating system
There are several options for operating systems on a Raspberry Pi. I ended up selecting the "default" one. Go to http://www.raspberrypi.org/downloads/ and select the one you want. I chose to go with Raspbian (Debian ported to Raspberry Pi). Also called on that size Debian Wheezy. The version I used was January 2014 with the release date 2014-01-07.
3. Prepare the SD card
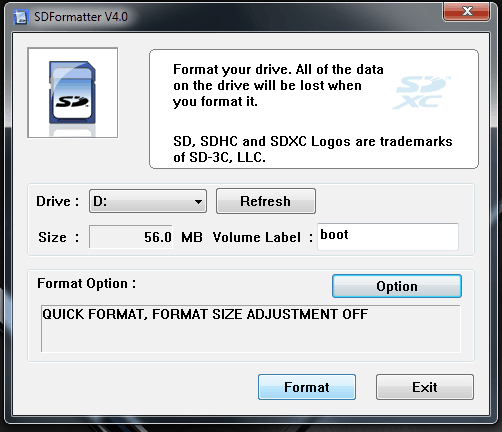
This step is long, so I do it prior to the training, and I do it before each and every training – just to show that I am starting from a vinyl system. Format the SD card To prepare the card, we need to format it and install the image on it: Run SDFormatter, and select Quick Format with no size adjustments.
Once done, it is time to write the image into it. Write the OS image Unzip the Raspbian image file you downloaded. Mine was called 2014-01-07-wheezy-raspbian.img with a size of ~2.8Mb. Run Win32 Disk Imager, select the image file and write it to the SD card. This is going to take a few minutes.

4. Find your Raspberry Pi on the network
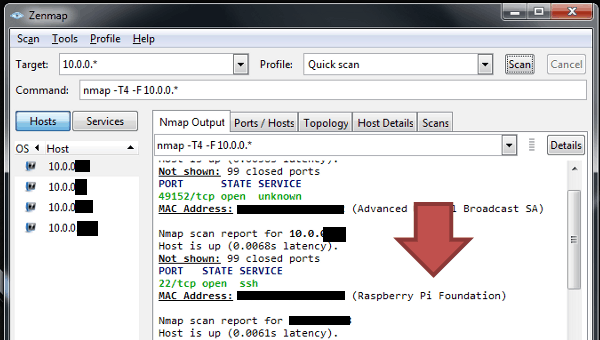
Plug the SD card into your Raspberry Pi, connect it to the power and the network with the Ethernet cable. Since I don't usually have extra display and keyboard in these sessions, my only option to login to the Raspberry Pi is over the network. For that, I am using Zenmap in order to find out the IP address the Raspberry Pi got. Run Zenmap. Write in the target your subnet. For me, that’s 10.0.0.* Switch the profile to Quick scan Count to 10. Look at the results and search for a (Raspberry Pi Foundation) MAC address. That's going to have the IP address of your Raspberry Pi. Here's how it looks for me:
Now use your SSH client to login to this IP address. The default username is pi and the default password to go along with it is raspberry.
5. Install Node.js on Raspberry Pi
Logged in? Good. Node.js doesn't come preinstalled on a Raspberry Pi, so we need it there. Googling a bit, got me to this set of instructions. What I need is:
- Node.js
- Websocket support for Node.js
Run the following from the command line of your Raspberry Pi:
wget http://node-arm.herokuapp.com/node_latest_armhf.deb
sudo dpkg -i node_latest_armhf.deb
npm install websocket
The last one installs Websocket support.
6. Get your preferred WebRTC sample
For me, that would be Rob Manson's Getting Started With WebRTC. This code is explained in detail in his book under the same name which I reviewed here already. Since this is on Github, we follow these instructions:
git clone git://github.com/buildar/getting_started_with_webrtc
cd getting_started_with_webrtc
7. Prepare the sample
Rob's sample requires one additional step. The Node.js code sends a .html file to the browser, and in it, there's an indication where the Websocket signaling need to go to. In the HTML file, that's set to "localhost". I had to change that value to the IP address of my Raspberry Pi. For that, just use:
Looking for a WebRTC sample? There’s a GitHub repo for that(Opens in a new browser tab)
nano video_call_with_chat_and_file_sharing.html
Change in line 149 from "ws://localhost:1234" to "ws//<ip-address>:1234"
8. Showoff
Start the server by calling:
node webrtc_signal_server.js
Connect 2 browsers to the IP address of your Raspberry Pi at port 1234, or 2 tabs from the same browser. For this sample, you will need to connect the first browser, and then copy the URL provided on the screen to the second browser to join the session.
Why does this matter?
Before WebRTC, getting such a thing to work from source to running a demo took a day or a week.
Now it is down to 5 minutes.
If you wanted disruption, then here you have it: WebRTC is all about reducing the barrier of entry for developers.
It can't get any simpler than this hello world sample.
Need to know where WebRTC is available? Download this free WebRTC Device Cheat Sheet.
