Explore rtcstats and its significance in real-time communication. Discover how it can enhance your applications today.
Developing WebRTC applications isn’t simple. Getting to a “hello world” proof of concept is not hard, but from there to a production ready application? That’s a totally different ballgame.
One of the things I do a lot when assisting clients with WebRTC is around improving and optimizing their WebRTC application’s connectivity and media quality. After the first couple of weeks, the time comes to look at results or to figure out where to spend your time. And that becomes close to impossible since vendors seldomly set up a decent WebRTC observability for their application – there’s always something more important to do.
Along with Olivier Anguenot and Philipp Hancke we’ve launched rtcstats.com, a SaaS platform for troubleshooting webrtc-internals dump files.
For those who want to self host their monitoring system and metrics, we’re relying on gibthub.com/rtcstats, a mature open source project originally built and maintained by Philipp. He took the time to polish and modernize it, making it the best solution for today’s needs.
In this article, we’re going to explain and show how you can use rtcstats’ open source project in your own application to set up a stellar monitoring environment.
I’ve written this article with the help of Philipp Hancke.
Key Takeaways
- Developing WebRTC applications is challenging; achieving a production-ready app requires attention to connectivity and media quality
- rtcstats.com offers a SaaS platform for monitoring WebRTC applications, while the rtcstats open-source project provides a self-hosting solution
- Integrate rtcstats.js into your app to collect vital metrics; it saves resources and improves efficiency
- Configure the rtcstats-server to capture WebRTC-internals dump files, enabling deeper analysis of application performance
- Implement WebRTC observability early to track performance trends and optimize the user experience effectively
Table of contents
Adding rtcstats.js to your client app

rtcstats.js is a client-side SDK in charge of collecting all that WebRTC-goodness. The metrics and events you’ll need when things go bad.
The main concepts here are:
- Collect everything you may need. We later use rtcstats.com to view only what you really need (rtcstats.js is the more part and rtcstats.com is the less part of the less is more method we employ)
- Don’t send useless or redundant stuff. We’re trying to save on network as much as possible to avoid competing with the actual media traffic, and we succeed quite nicely
- Be unobtrusive. You do as little as possible when integrating the SDK. And the SDK uses as little resources as possible so as not to affect your application’s behavior
How do you add it to your Javascript app exactly? The first thing to do is to install `rtcstats-js` using npm and have it added as a dependency:
npm install –save @rtcstats/rtcstats-js
Next, you need to actually use it in your Javascript application and allow it to wrap any RTCPeerConnection objects created by the application. This happens transparently for any SDK used by using the polyfilling techniques that adapter.js has been battle-testing for over a decade now. Typically you want the default configuration which means wrapping peerconnection events, getUserMedia/getDisplayMedia and everything related, polling statistics once per second:
const trace = wrapRTCStatsWithDefaultOptions();
This creates a “tracing function” using the default WebSocket-based trace to connect to a rtcstats-server of your choice and send the gathered data there. This should be done before any RTCPeerConnection is created and before getUserMedia or related methods are called so they can be captured.
Next, you need to instruct this trace function to actually connect to your rtcstats-server instance:
trace.connect('ws://localhost:8080/?rtcstats-token=' + token');
This relies on a JWT token generated by your backend (or the signaling server) to authenticate the WebSocket client and tell the rtcstats-server a bit about the user, the session and the conference context in which the connection is going to be used. See the bundled example for a minimal version or this commit where we added JWT support to a fork of our codelab with the signaling server generating the token. While it is possible to run without this kind of authentication it is not recommended in production. You might want to skip this part for now and come back after the server is up and running. Next, we will show how to install and start the server.
rtcstats-server – the silent collector of webrtc-internals dump files

The rtcstats.js generates rtcstats files which are similar but still different from webrtc-internals dump files. We will simply assume webrtc-internals files for both file types – as they serve the same purpose.
What we did with rtcstats-server is make a simple and straightforward mechanism to get the webrtc-internals dump file that rtcstats.js is “generating” locally onto a server in your data center. Once there, you can take it into a couple different directions that we’ll cover later.
For now, here’s how you get started with rtcstats-server. We typically recommend deploying it to a service like DigitalOcean’s AppPlatform which makes it easy to deploy nodejs-based servers while handling details like TLS. For a local installation the first step is to clone the rtcstats monorepo:
git clone https://github.com/rtcstats/rtcstats.git
And then install the dependencies:
npm install
Next we need to configure the server. As a first step the default configuration gives you a local setup which does not yet upload the generated dumps to a cloud storage of your choosing and does not write to a database yet. You can copy the
packages/rtcstats-server/config/default.yaml
to
packages/rtcstats-server/config/development.yaml
and make incremental changes to it, such as setting the “deleteAtStart” and “deleteAfterUpload” options to false for the time being.
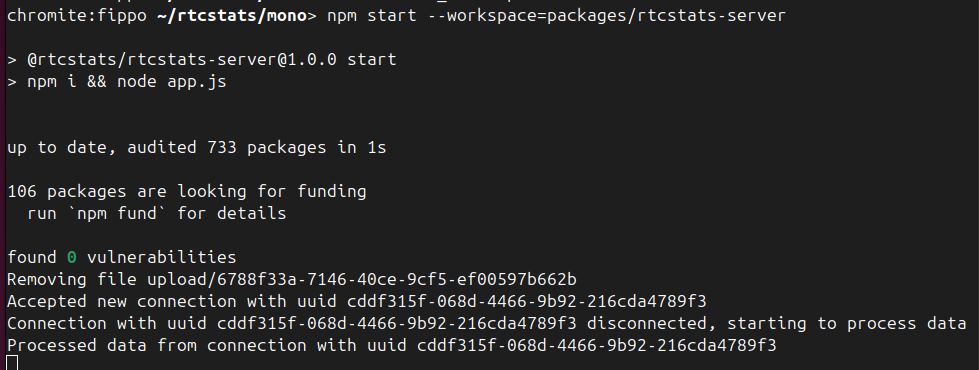
After starting the server with
npm start --workspace=packages/rtcstats-server
make a call from your locally running video calling app and see if it connects successfully which should show a console log like shown below:
Once that works, the fun part starts… configuring the cloud storage and the database. rtcstats-server should work out of the box with any storage compatible with Amazon S3 and a Postgres database. Supabase provides both and is cheap for testing it out. You just need to create the bucket and fill the storage defaults into the “storage” section of the YAML file used for configuration (production deployments will probably use an environment variable for this as described here).
At this point, you should:
- Configure it with the configuration data you got from your cloud provider. Ffor supabase the “forcePathStyle” option needs to be true
- Restart the server
- Make a call
You should ideally see a file with the client id from the logging show up in your bucket:
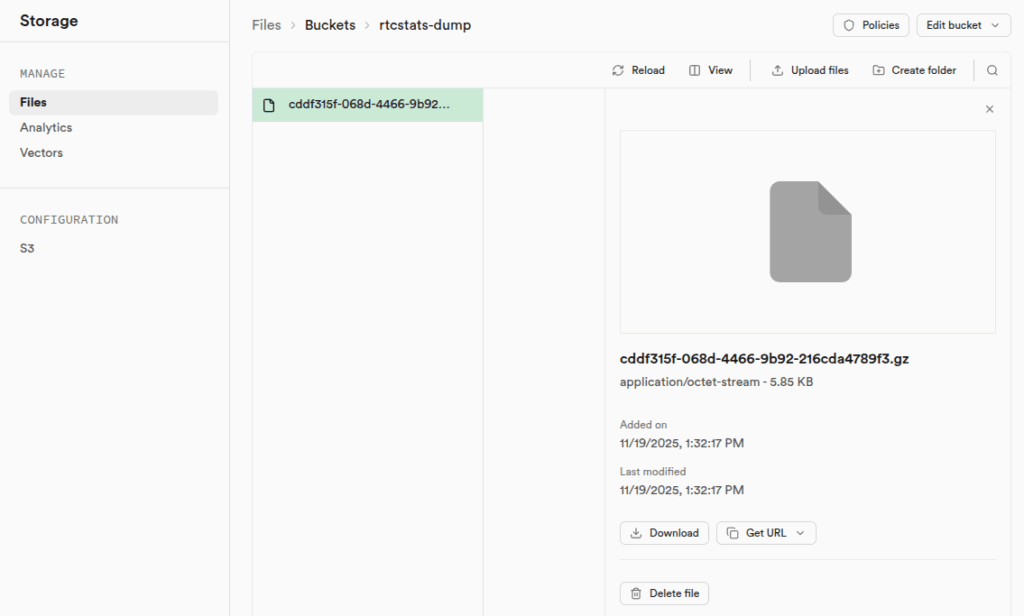
You can download that file from there and import it on rtcstats.com.
The next step is to configure the database. Grab the credentials and add them to the “database” section of the configuration. Making a call after restarting should show an error since the database is still missing the tables that rtcstats-server is expecting. When using supabase, you can go to the packages/rtcstats-server directory and link with your project on supabase using
npx supabase link
And then run
npx supabase db push
Without supabase, you will have to run the SQL statements from the migrations directory manually. You can verify whether that part worked by making another call and watch for any errors. If there are none… you should have a dump file in your cloud storage bucket and some information about it in the database which you can query like this:
select * from "rtcstats-server" order by created_at desc
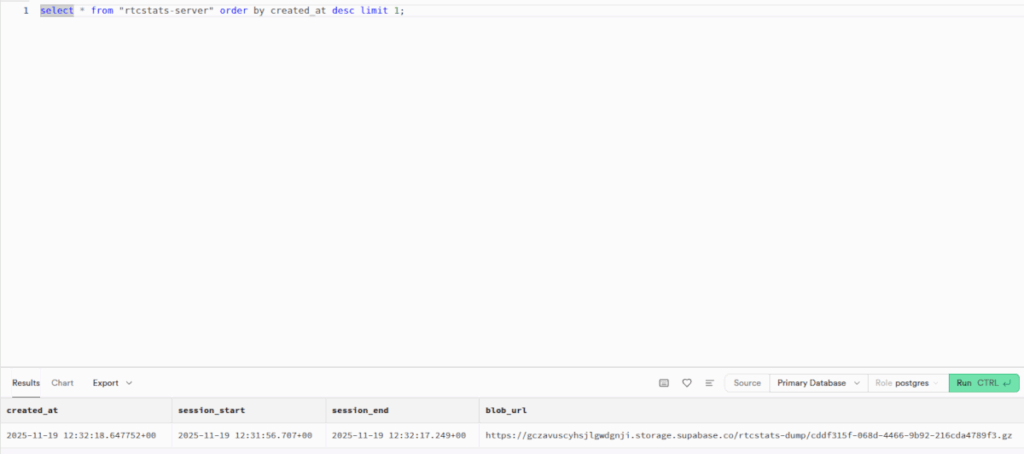
This gives you the “blob_url” from which you can download the file (e.g. using Supabase’s web-based UI) and upload it to rtcstats.com to actually view it.
Once you are happy with your local setup there is an easy trick to get the config file and convert it to JSON to pass as NODE_ENV to Docker or DigitalOcean’s AppPlatform: in rtcstats-server.js do a
console.log(JSON.stringify(config))
and copy/save that. Don’t forget to configure authentication, generate a JWT in your backend and pass it along.
–
Now that we have it set up and ready, time to see what we can do with it in the long term.
Getting the most out of rtcstats

First step – putting the mechanism to collect your WebRTC statistics and events. You take them from the client devices and send them towards a monitoring server.
Next, is figuring out what to do with this new treasure trove of data that is now available to you.
Let us suggest a couple of ideas with you, so you can figure it out on your own.
WebRTC metrics sending on demand

If you don’t want to store the data on the server due to whatever reasons you may have, one alternative is to store them in the browser’s memory (or files if you’re using Electron) and then send it towards the server on demand:
- Had a specific issue with the last session?
- The user ranked the call with 1 star only?
- Session got cut off unceremoniously?
At some point, either due to a decision of a support person on your end, or some automated rule, you can send that rtcstats file to the server for analysis.
This approach means you don’t have to store a lot of files on the server side, or manage them. And also you’re not dealing much with any potential privacy issues that may exist.
I am not sure if this is the best approach, but it is definitely a possibility.
On demand troubleshooting

For me, this is the classic starting point on your road towards true WebRTC observability.
You use rtcstats to collect everything at all times from all WebRTC sessions. Have all these rtcstats files stored on a designated S3 bucket or similar, with a deletion rule for 30 days or whatever other value that makes sense to you.
And you do nothing further.
At least not until you want to look at a certain session. At that point in time, what you do is upload that file to rtcstats.com (manually or via our API). And then troubleshoot that session with our service.
This has the benefits of:
- Being able to view any session you wish
- Low cost because your use of rtcstats.com is rather limited
This gives a great starting point – from here, you can decide for yourself without a considerable investment of time or money, what value you derive from this.
WebRTC connectivity and media quality optimization

Continuous and ongoing optimization of your WebRTC application requires observability. One way or another, you will need to be able to look at WebRTC statistics of “before and after” to figure out if what you are doing has improved things or worsened them.
Here there are two ways to go about it:
- Collect data on tests conducted by your engineering team and QA. When doing that over such controlled environments, it gives insights to the changes and optimizations made and how they affect the behavior of your WebRTC application
- Collect data from live users, maybe even conducting an experiment on part of your users with the new code. Then you can compare behaviors of actual users – a kind of A/B testing similar to what Chrome field trials are about
Whatever approach you take, if you are looking to optimize the quality of your application you should have the means to validate that the work you do benefits behavior and users and isn’t just theoretical in nature.
Trends analysis of WebRTC behavior

If optimizing is something you do intentionally, then bear in mind that WebRTC implementations in browsers change their behavior without asking permission from you (I know it is infuriating, but that’s life).
This is also true for other third parties you might be using such as managed TURN services and CPaaS vendors.
By collecting WebRTC metrics and keeping tabs on the behavior of your WebRTC application, you will be able to understand the changes that take place throughout your service – from an increase in the number of calls that get connected via TURN/TCP to an increase of RTT in a given country or region.
Don’t wait with WebRTC observability

Once you have a WebRTC application and it has users, you need to start figuring out how to add WebRTC observability into the mix.
The same way you wouldn’t deploy servers without monitoring them (I hope that’s the case), then you shouldn’t do that to your WebRTC users either. What you can’t see you can’t know and what you don’t know you won’t be able to fix.
The best time to add observability to a WebRTC application? Yesterday. You might already be a wee bit late 😉